Plant Care Guides
Empowering every plant parent with the knowledge to help their green companions thrive.
How Often Should You Water?

Watering is the single most important factor in keeping your indoor plants healthy — and the most common source of problems. The key is understanding that every plant has its own rhythm, and that rhythm changes with the seasons. Use the schedule below as a starting point, then adjust based on your home's humidity, light levels, and temperature.
| Plant Type | Spring/Summer | Fall/Winter | Signs of Thirst |
|---|---|---|---|
| Monstera | Every 7–10 days | Every 14–18 days | Drooping leaves, dry top 5 cm of soil, leaves curling inward |
| Snake Plant | Every 14–21 days | Every 28–35 days | Wrinkled or curling leaves, soil completely dry and pulling from pot edges |
| Pothos | Every 7–10 days | Every 14–18 days | Wilting stems, leaves losing their glossy sheen, dry soil to the touch |
| Fiddle Leaf Fig | Every 7–10 days | Every 10–14 days | Brown edges on leaves, drooping, top 3 cm of soil dry |
| Peace Lily | Every 5–7 days | Every 10–14 days | Dramatic drooping of all leaves, pale or yellowing foliage |
| Calathea | Every 5–7 days | Every 10–14 days | Leaves curling inward, brown crispy edges, soil surface dry |
Yellowing Leaves
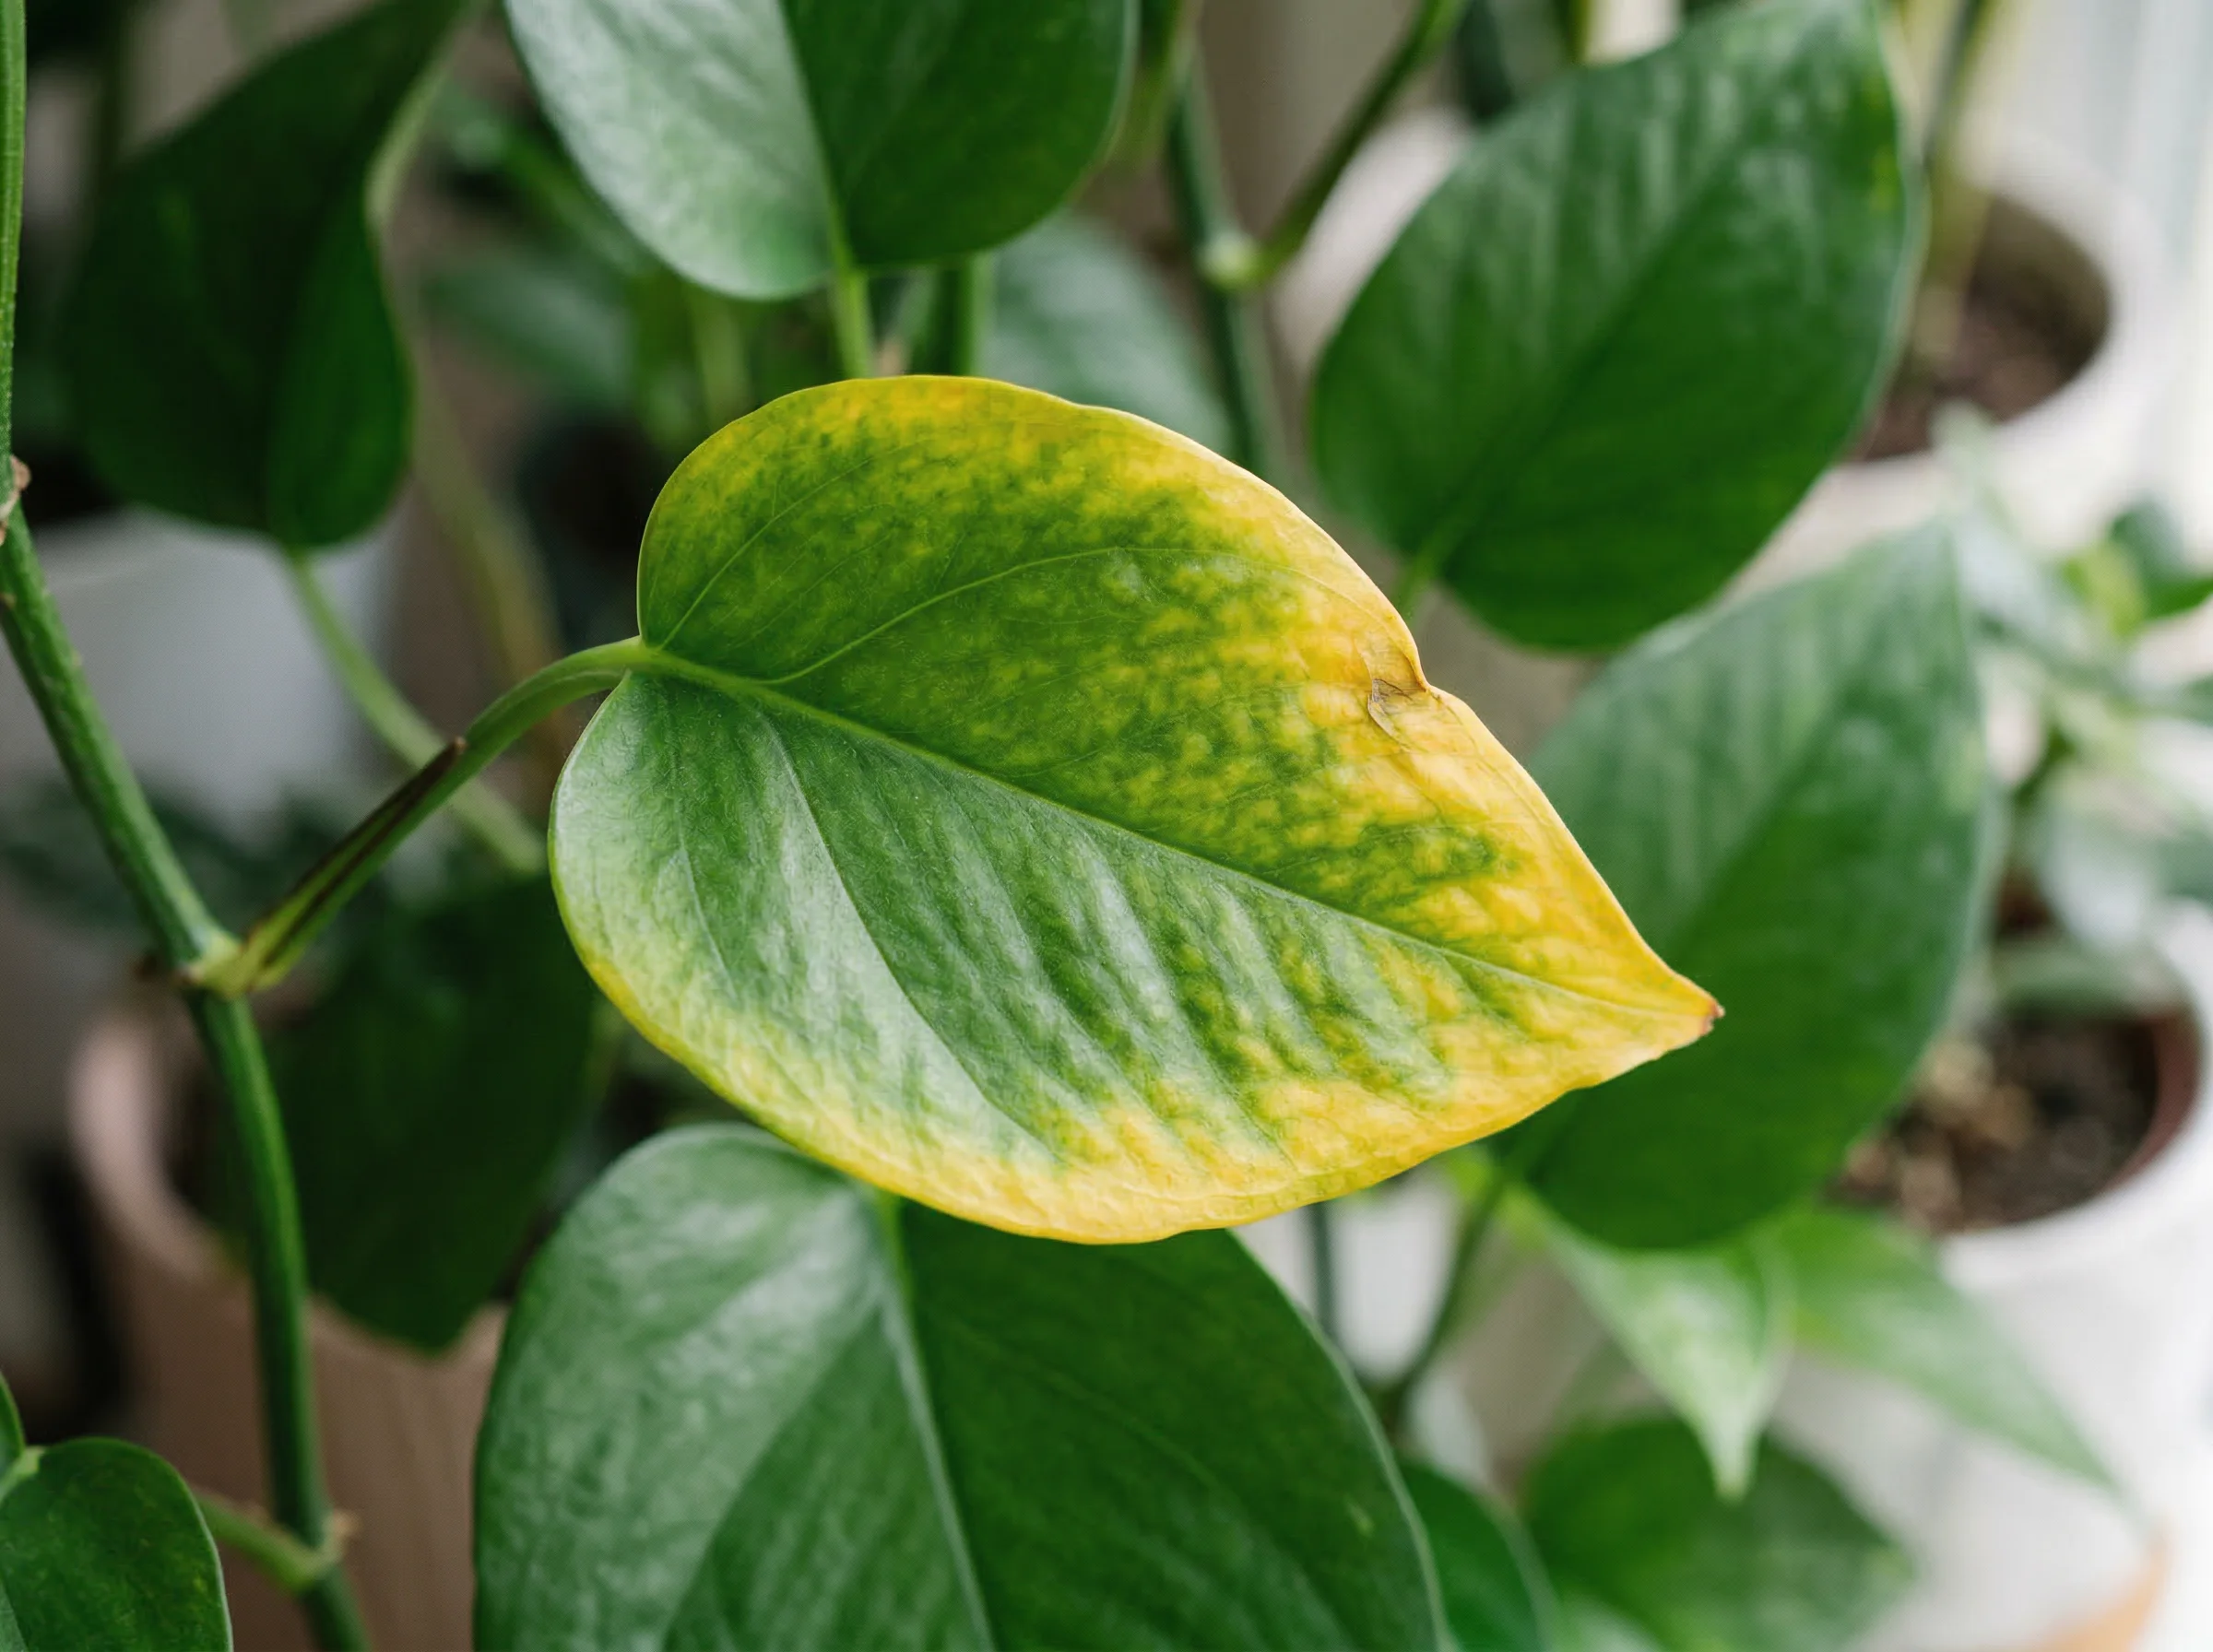
Yellow leaves are one of the most common concerns for plant parents, but they are also one of the most informative signals your plant can give you. The cause can range from a simple watering mistake to a nutrient imbalance. Expand each section below to diagnose and fix the issue.
Symptoms: Leaves turn uniformly yellow, starting from the lower leaves and working upward. The soil feels soggy or waterlogged, and you may notice a musty smell coming from the pot. In severe cases, stems become soft and mushy at the base.
Why it happens: When roots sit in water for too long, they cannot absorb oxygen. This leads to root rot, which prevents the plant from taking up nutrients — causing the yellowing you see above the soil line.
How to fix:
- Stop watering immediately and allow the soil to dry out completely before the next watering.
- Remove the plant from its pot and inspect the roots. Trim any brown, mushy, or foul-smelling roots with sterilized scissors.
- Repot in fresh, well-draining soil with a pot that has adequate drainage holes.
- Adjust your watering schedule — always check the top 3–5 cm of soil before watering again.
Symptoms: Leaves turn yellow with dry, crispy brown edges. The yellowing often appears on older leaves first. The soil is bone-dry, may be pulling away from the sides of the pot, and feels lightweight when you lift it.
Why it happens: Without enough water, the plant cannot transport nutrients from the soil to its leaves. It begins sacrificing older growth to conserve energy for new leaves, causing the lower foliage to yellow and drop.
How to fix:
- Give the plant a thorough bottom-watering: place the pot in a basin of water for 20–30 minutes until the soil is evenly saturated.
- Trim any fully yellowed or brown leaves — they will not recover.
- Establish a consistent watering routine using the schedule table above as a guide.
- Consider using a moisture meter to take the guesswork out of watering timing.
Symptoms: Yellowing on the side of the plant facing away from the light source. Leaves may also appear pale, washed out, or bleached if receiving too much direct sun. Leggy growth with long gaps between leaves indicates insufficient light.
Why it happens: Chlorophyll production depends on the right amount of light. Too little light starves the plant of energy, while too much direct sun can scorch leaves and break down chlorophyll — both resulting in yellow foliage.
How to fix:
- For too little light: move the plant closer to a window or supplement with a full-spectrum grow light for 10–12 hours daily.
- For too much light: relocate away from direct afternoon sun. Use a sheer curtain to filter harsh rays while maintaining brightness.
- Rotate the plant a quarter turn each week to ensure even light exposure on all sides.
- Match the plant to the right spot — check its light requirements and use a light meter app to measure your room's lux levels.
Symptoms: Yellowing between leaf veins while veins stay green (interveinal chlorosis) often indicates iron or magnesium deficiency. Overall pale yellow new growth may signal nitrogen deficiency. Purple-tinged undersides with yellow tops can point to phosphorus issues.
Why it happens: Over time, plants deplete the nutrients in their potting soil. Without replenishment through fertilizing or repotting, essential minerals run low and the plant cannot produce healthy green chlorophyll.
How to fix:
- Feed with a balanced liquid fertilizer (NPK 10-10-10) diluted to half strength during the growing season (spring and summer).
- For iron deficiency specifically, apply a chelated iron supplement to the soil.
- Repot into fresh potting mix every 12–18 months to replenish depleted soil nutrients.
- Avoid over-fertilizing — too much fertilizer can cause salt buildup and brown leaf tips. Always follow the product's recommended dosage.
Symptoms: One or two of the oldest, lowest leaves gradually turn yellow and drop off while the rest of the plant looks perfectly healthy and continues to produce new growth. This happens slowly and predictably.
Why it happens: This is completely normal. As plants grow, they naturally redirect energy from older leaves to support new growth. The plant reabsorbs nutrients from aging leaves before shedding them — it is a sign of a healthy, growing plant.
How to fix:
- No action needed — this is healthy behavior. Simply remove the yellowed leaf once it is mostly yellow or comes off easily with a gentle tug.
- Do not pull leaves that are still partially green, as the plant is still extracting nutrients from them.
- If more than one or two leaves are yellowing at a time, investigate other causes listed above.
- Continue your regular care routine and enjoy the new growth your plant is investing in.
Grow Your Collection for Free
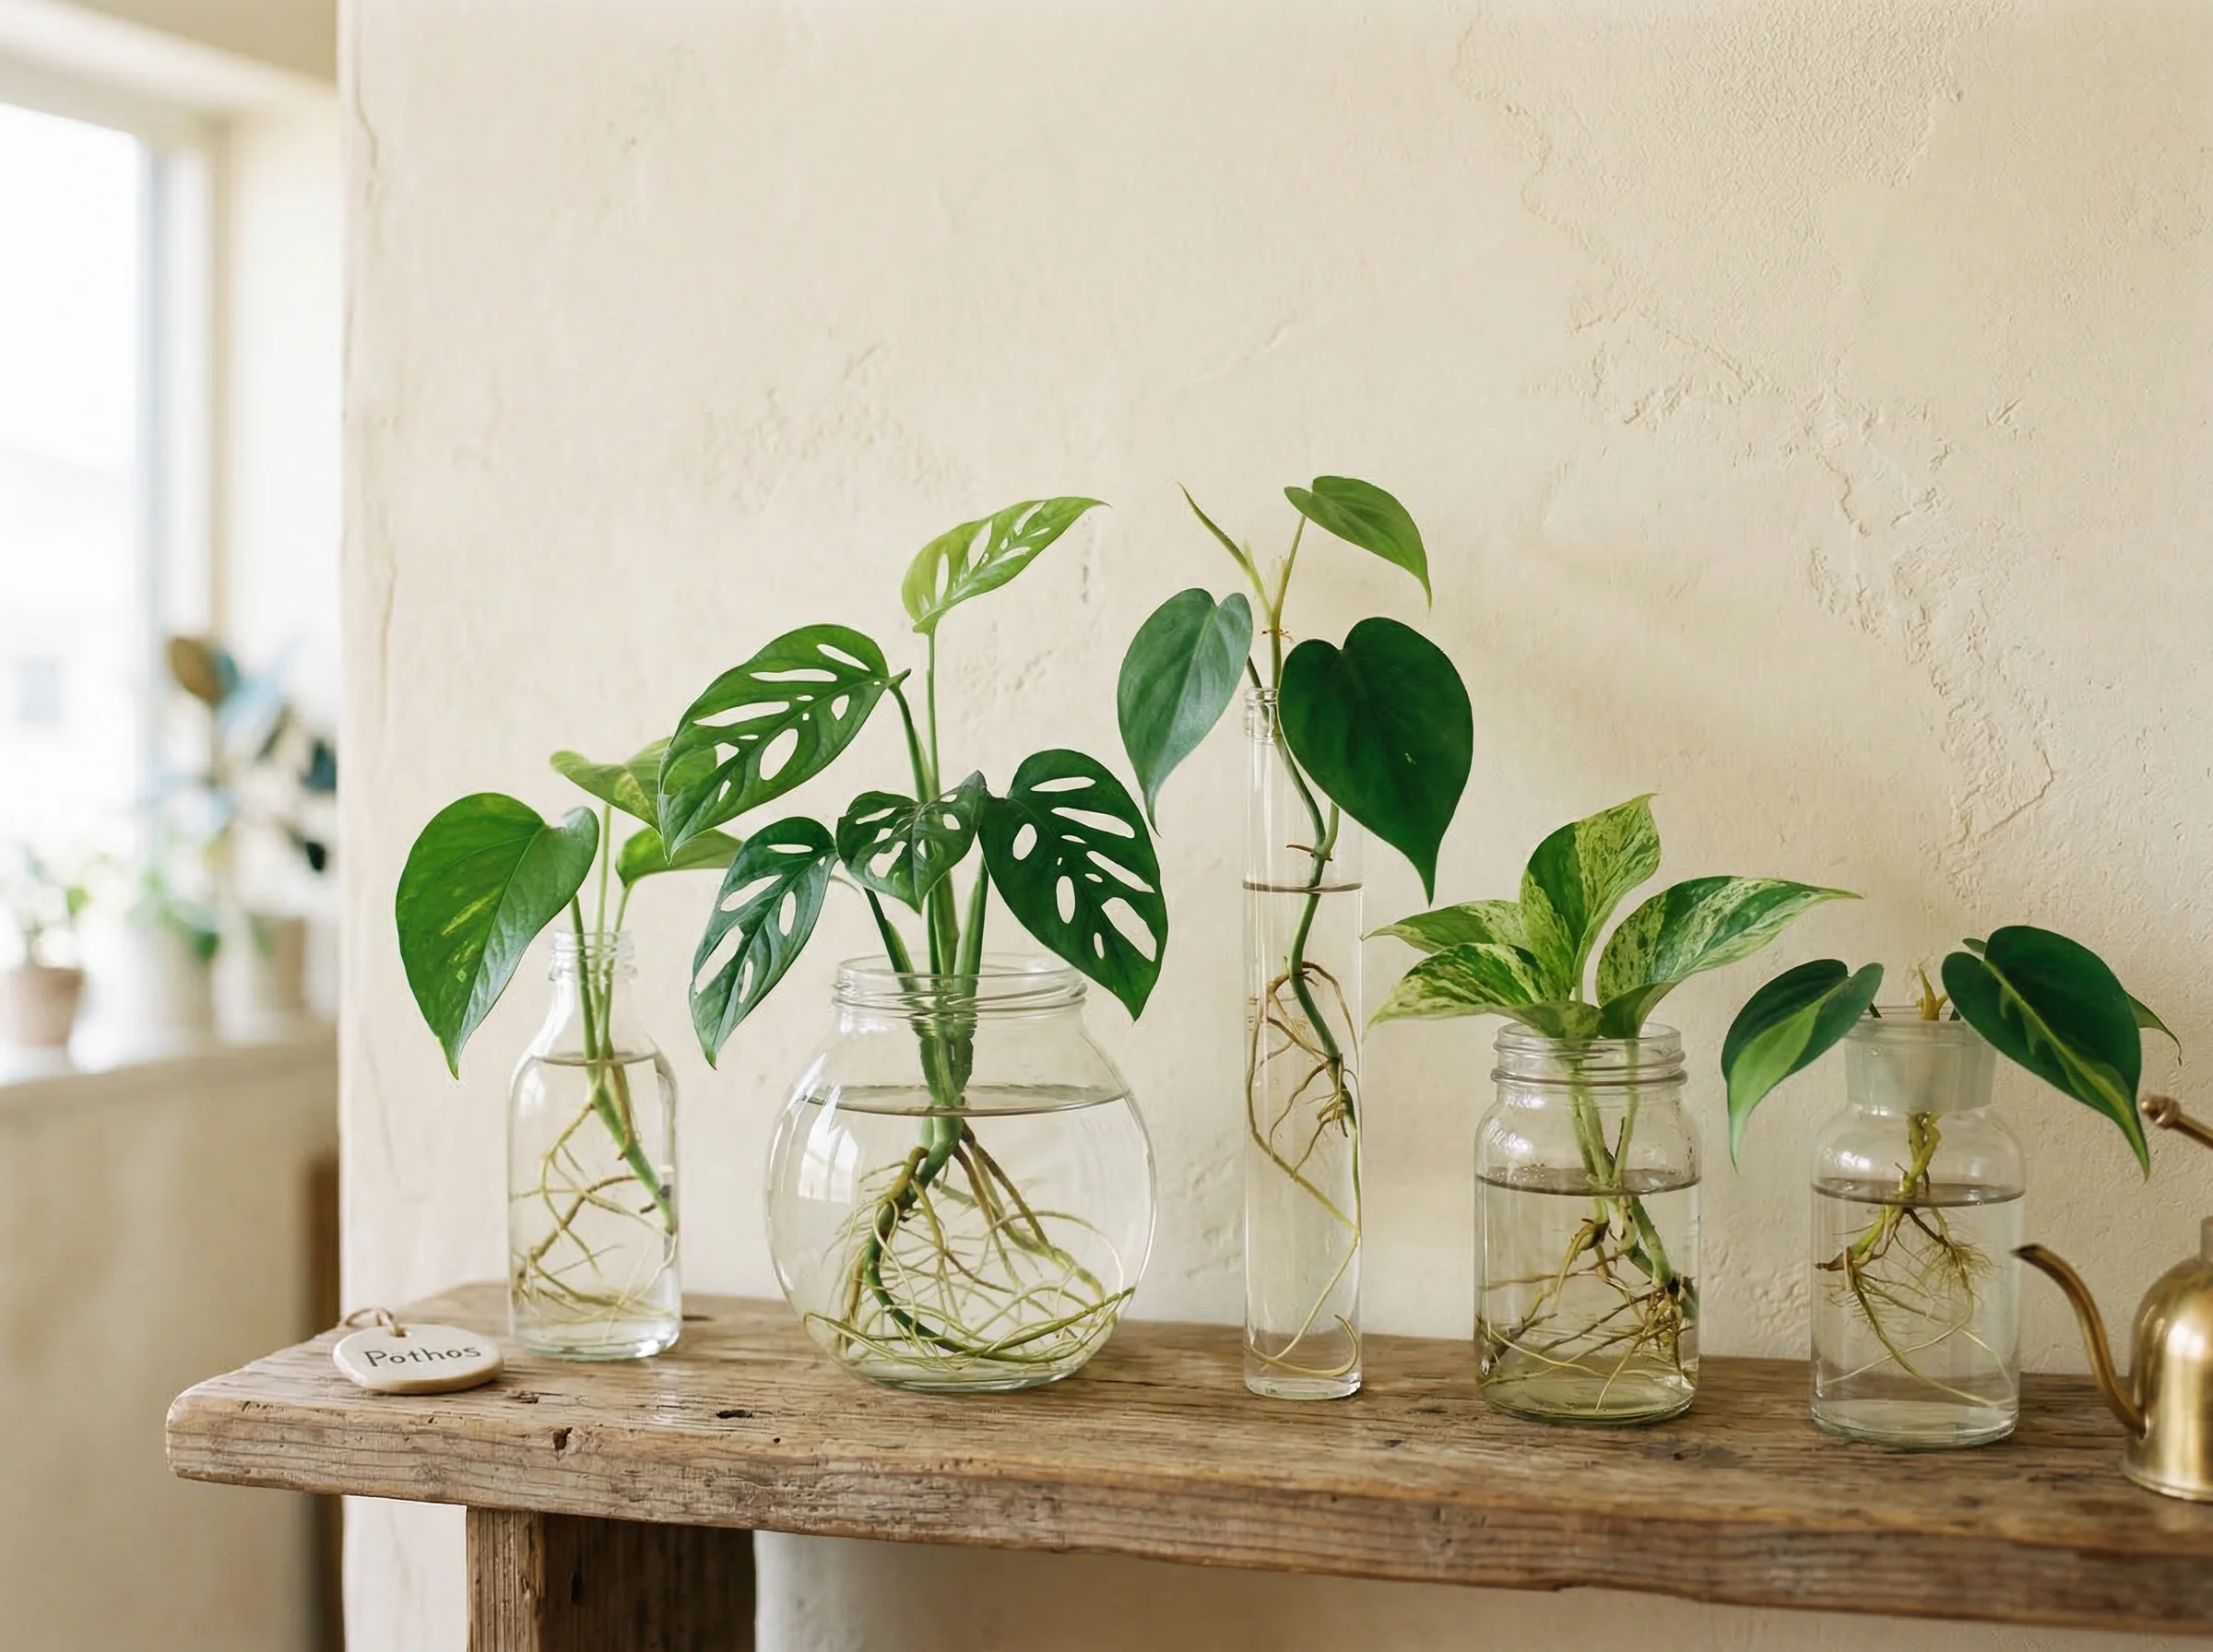
Propagation is one of the most rewarding skills a plant parent can learn. It allows you to multiply your collection, share plants with friends, and rescue leggy or overgrown specimens. Here are three proven methods to get you started.
Water Propagation
Best for: Pothos, Philodendron, Monstera, Tradescantia
- Identify a healthy stem with at least one node (the small bump where leaves or aerial roots emerge) and two or more leaves.
- Using sterilized scissors or pruning shears, cut about 1 cm below the node at a 45-degree angle.
- Remove any leaves that would sit below the waterline to prevent rotting.
- Place the cutting in a clean glass jar filled with room-temperature filtered water, ensuring the node is fully submerged.
- Set the jar in bright, indirect light and change the water every 3–4 days to keep it fresh and oxygenated.
- Wait for roots to grow to at least 5 cm in length (usually 2–4 weeks), then transplant into a small pot with well-draining soil.
Stem Cuttings
Best for: Fiddle Leaf Fig, Rubber Plant, Dracaena, Jade Plant
- Select a healthy, mature stem and cut a section 10–15 cm long with at least 2–3 nodes using sterilized shears.
- Remove the lower leaves, keeping only the top 2–3 leaves to reduce moisture loss.
- Dip the cut end into rooting hormone powder to encourage faster root development.
- Insert the cutting about 3–5 cm deep into a pot filled with moist perlite and peat moss mix.
- Cover the pot with a clear plastic bag or place in a propagation box to maintain high humidity around the cutting.
- Keep in warm, bright indirect light and mist daily. Check for root development after 3–6 weeks by gently tugging the cutting.
Division
Best for: Snake Plant, Peace Lily, Calathea, Boston Fern
- Water the parent plant thoroughly 24 hours before dividing to hydrate the roots and reduce transplant shock.
- Gently remove the entire plant from its pot and shake off excess soil to expose the root system.
- Identify natural separation points where the plant has distinct clumps or offsets with their own root systems.
- Using your hands or a clean knife, carefully separate the clumps, ensuring each division has a healthy portion of roots and at least 3–4 leaves.
- Plant each division into its own pot with fresh, well-draining potting mix appropriate for the species.
- Water each new plant lightly, place in a warm spot with indirect light, and avoid fertilizing for the first 4 weeks while roots establish.
Year-Round Plant Care Calendar
Spring is the season of renewal and the start of the active growing period for most indoor plants. This is the time to give your plants the boost they need for a healthy year ahead.
- Watering: Gradually increase watering frequency as days get longer and temperatures rise. Check soil moisture every 3–4 days instead of weekly.
- Humidity: As heating systems shut off and windows open, indoor humidity levels may fluctuate. Monitor with a hygrometer and mist tropical plants if humidity drops below 50%.
- Fertilizing: Resume feeding with a balanced liquid fertilizer at half strength every 2 weeks. This supports the burst of new growth typical in spring.
- Light: Days are getting longer — reassess plant positions to take advantage of increased natural light. Move shade-lovers back from windows that now receive stronger rays.
- Repotting: Spring is the ideal time to repot root-bound plants. Move up one pot size and refresh the soil to replenish nutrients.
Summer brings peak growth, but also the challenges of heat and intense sunlight. Tokyo summers are hot and humid, which most tropical plants love — but direct sun through glass can still scorch leaves.
- Watering: Water more frequently as heat accelerates evaporation. Some plants may need water every 4–5 days. Always water in the morning to avoid overnight moisture sitting on roots.
- Humidity: Tokyo's rainy season (June–July) naturally raises indoor humidity, which most tropical houseplants enjoy. However, ensure good air circulation to prevent fungal issues.
- Fertilizing: Continue bi-weekly feeding at full strength during peak growing months. Switch to a formula higher in nitrogen to support lush foliage growth.
- Light: Protect plants from harsh afternoon sun by using sheer curtains or moving them slightly back from south- and west-facing windows. Watch for signs of sunburn: bleached or brown patches on leaves.
- Pests: Warm weather increases pest activity. Inspect leaves regularly for spider mites, mealybugs, and fungus gnats. Treat early with neem oil or insecticidal soap.
As daylight hours shorten and temperatures cool, your plants begin to slow their growth. Fall is the transition period where you gradually scale back care to prepare for winter dormancy.
- Watering: Reduce watering frequency as growth slows and soil takes longer to dry. Check soil moisture before watering — most plants will shift to every 10–14 days.
- Humidity: As heating systems kick in, indoor air becomes significantly drier. Begin using humidifiers, pebble trays, or grouping plants together to maintain adequate moisture levels.
- Fertilizing: Taper off fertilizing by late October. Most plants enter a rest period and do not need or benefit from additional nutrients until spring.
- Light: Move plants closer to windows to compensate for shorter days and weaker sunlight. Consider supplementing with grow lights for light-hungry species.
- Temperature: Keep plants away from cold drafts near windows and doors. Most tropical houseplants suffer below 15°C — monitor room temperatures as evenings get cooler.
Winter is the resting season for most houseplants. Growth slows dramatically or stops entirely. Your primary job is to keep conditions stable and avoid the temptation to over-care.
- Watering: Reduce watering significantly — overwatering in winter is the number one killer of houseplants. Allow soil to dry out more thoroughly between waterings. Many plants need water only every 2–3 weeks.
- Humidity: Indoor heating creates very dry air. Run humidifiers near plant groupings, mist regularly, and consider placing moisture-loving plants in the bathroom where steam provides natural humidity.
- Fertilizing: Stop all fertilizing from December through February. Feeding dormant plants can cause fertilizer salt buildup in the soil, which damages roots.
- Light: Maximize every bit of available light. Clean window glass to remove grime that blocks rays. Position plants in your brightest spots and use full-spectrum grow lights set to 12-hour timers for tropical species.
- Temperature: Maintain consistent temperatures between 16–22°C. Avoid placing plants near heating vents, radiators, or cold window panes. Sudden temperature swings cause stress, leaf drop, and vulnerability to pests.
We Are Here for You
Not sure which plant is right for your space, or need personalized care advice? Our tools and team are ready to help.